VPN: Difference between revisions
No edit summary |
No edit summary |
||
| Line 1: | Line 1: | ||
A Virtual Private Network (VPN) is a tool used for connecting your computer to a company's internal network. Connecting to the RENCI VPN makes it look like you are physically located inside the RENCI office, which allows you to access various internal websites that aren't exposed on the public internet (likewise for the UNC VPN). | |||
== RENCI VPN == | == RENCI VPN == | ||
In order to connect to the RENCI VPN, you must first download the latest version of the OpenVPN client. The directions are as follows: | |||
# Visit https://vpn.renci.org | # Visit https://vpn.renci.org | ||
| Line 15: | Line 13: | ||
# Click on the "plus" icon located at the bottom right hand corner of the client to import the user-locked profile you just downloaded | # Click on the "plus" icon located at the bottom right hand corner of the client to import the user-locked profile you just downloaded | ||
# After the import, in the client, toggle the switch next to your imported profile to connect to the RENCI VPN | # After the import, in the client, toggle the switch next to your imported profile to connect to the RENCI VPN | ||
When a new version of the client is released, you should complete the same steps again. | |||
Should any issues arise during an installation or upgrade, please uninstall the client and attempt the installation again. If any issues persist with the install, please contact help@renci.org for assistance. | |||
== UNC VPN == | == UNC VPN == | ||
Revision as of 16:57, 7 October 2022
A Virtual Private Network (VPN) is a tool used for connecting your computer to a company's internal network. Connecting to the RENCI VPN makes it look like you are physically located inside the RENCI office, which allows you to access various internal websites that aren't exposed on the public internet (likewise for the UNC VPN).
RENCI VPN
In order to connect to the RENCI VPN, you must first download the latest version of the OpenVPN client. The directions are as follows:
- Visit https://vpn.renci.org
- Provide your RENCI credentials
- Download the OpenVPN Connect client recommended for your device
- Install the client
- Back on the OpenVPN webpage, at the bottom, click and download Yourself (user-locked profile)
- Start the openVPN client
- Click on the "plus" icon located at the bottom right hand corner of the client to import the user-locked profile you just downloaded
- After the import, in the client, toggle the switch next to your imported profile to connect to the RENCI VPN
When a new version of the client is released, you should complete the same steps again.
Should any issues arise during an installation or upgrade, please uninstall the client and attempt the installation again. If any issues persist with the install, please contact help@renci.org for assistance.
UNC VPN
Instructions to install UNC's VPN Client can be found here: ITS Knowledge - ITS. Select your respective operating system under the Obtaining and installing the VPN section and follow the directions.
Connecting to UNC VPN
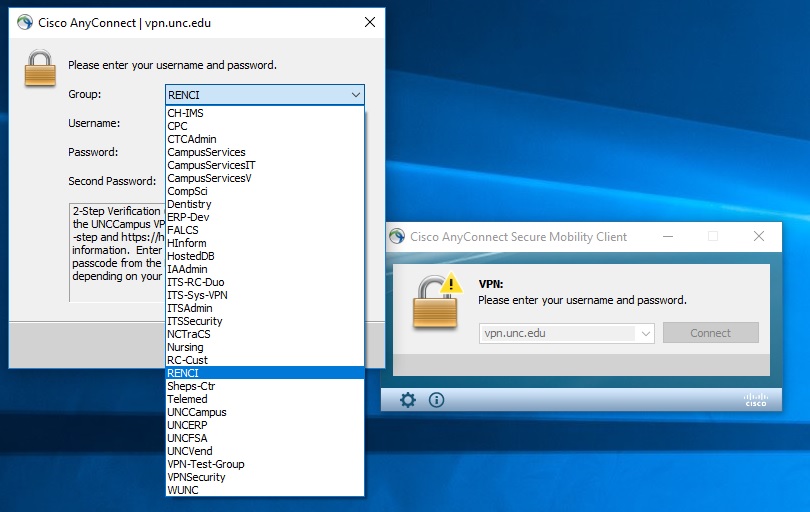
After the client has been installed from the UNC site above you can connect using the RENCI group and your ONYEN username and password.
Error Troubleshooting
RENCI - OpenVPN Connect
UNC - Cisco AnyConnect
If you receive an error during the installation or when trying to launch UNC's Cisco AnyConnect VPN, stating "VPN client agent was unable to create the interprocess communication depot", perform the following methods:
- Method 1: Disable Internet Connection Sharing (ICS)
- Press Windows key + R to open a Run box, then type “control” and press Enter to open Control Panel.
- Inside Control Panel, change the View by type to Category from the top-right corner.
- Then, click on View network status and tasks (directly under Network and Internet).
- In the Network and Sharing Center window, click on Change adapter settings from the left-hand side submenu.
- In the Network Connections screen, look for the network (or networks) that has Shared in the Status column, then right-click on it and choose Properties.
- In the Properties screen, go to the Sharing tab and uncheck the box associated with Allow other network users to connect through this computer’s Internet connection.
- Click Ok to save the changes.
- Try to install or run Cisco AnyConnect again.
If the above steps do not resolve the error OR "Allow other network users to connect through this computer’s Internet connection" is already unchecked, try the Method 2.
- Method 2: Changing the startup type of the ICS service to Disabled
- Press Windows key + R to open up a Run dialog box. Next, type “services.msc” and press Enter to open up the Services screen.
- In the Services window, use the right-hand pane to scroll down through the list of services and locate the Internet Connection Sharing (ICS) entry.
- Once you see it, right-click on it and select Stop to turn off the service.
- Right-click on Internet Connection Sharing (ICS) and select Properties.
- In the Internet Connection Sharing (ICS) Properties window, under the General tab, change the startup type to Disabled using the drop-down menu. Then, click Apply to save the changes.
- Try to install or run Cisco AnyConnect again.
